Showing posts with label pinterest. Show all posts

Thursday, April 05, 2012

Paid In Full!

I found this idea on pinterest (of course!) The original source is Mom on Timeout.

These coin covered crosses represent the true meaning of Easter: "Paid in Full"! 
Here is her version:


Here are my 3 on the wall.

I started with a tip (also from Pinterest!). I put thumb tacks on the back of the wood blocks before I painted. It kept the crosses from sticking to the newspaper!

I painted each of the crosses with acrylic paint (burnt umber, I believe).
I spent $13 at Hobby Lobby for the crosses: 1 paper mache box (about $2), 2 small wooden "stacking" crosses (79 cents each), 1 fun foam (two thick layers) cross (99 cents) and 1 large wooden "stacking" cross ($8).

Fun foam cross.  This was two layers of thick fun foam with a cut-in hanger on the back.  The original blogger worked hard to find shiny pennies.  I did try to clean mine (tooth paste, as well as a vinegar/salt soak) without much success.  But I also liked the idea of an "Old Rugged Cross", rather than a polished one. (About 47 pennies).

I made two of these. 28 cents each. These didn't have a hanger, so I used a soda can pull tab.

The large cross (about $1 in pennies). I made this one for my boss who collects crosses.  When I ran out of pennies, I grabbed my father-in-law's stash (with his permission, of course!)  He had quite a number of shiny new pennies, so I decided to go ahead and do a shiny one.  The lighting was bad--I'm not sure why it looks yellow?!?!?

Now my kids want to make some, so I need to go back to Hobby Lobby and get some pennies from the bank.

Friday, March 23, 2012

Child Training Bible

A couple of weeks ago on Pinterest, I found the Child Training Bible, and I was intrigued. I followed the link to the website: ChildTrainingBible.com and immediately ordered one.  This is unusual for me....normally I go, "Hey that's really cool! I should buy (or make) one of those!" and then forget about it.  But I ordered it on the spot.  It arrived within 4 or 5 days.

 coahbutton

What I received was:

1 Child Training Bible Key (gloss cardstock)
3 Easy Tabbers (double-sided gloss cardstock)
1 Set of Instructions to make your Child Training Bible


The website does list the size of the Bible it fits (Fits 9"x 6" Bibles exact dimensions (8.75" x 5.75") but my Bible is a little bit smaller.  

But what is the Child Training Bible?  From the website:

This Bible is designed for parents and children to seek answers from God’s Word on common sinful problems.  Topics include: disobedience, selfishness, anger, complaining and fear.  The Child Training Bible makes it easy for parents to bring the truth of God’s Word into times of instruction.  Simply use the key on the inside-front cover of the CTB to locate the sinful behavior and find the section and color flags to go to.  Read the highlighted verses with your child and explain what God says about the behavior that needs to be addressed.  With the CTB you can make the most of your time with your children by using Scripture to instruct them in righteousness.

 I had a little trouble finding the Post It Tabs.  If you look closely, you will see that I used 3 different types.  I found a pack of Sharpie highlighters with all of the colors (plus orange).
 
The biggest challenge was lining up the top and bottom tabs since the pages don't lay flat, many of my tabs weren't in line.

Everybody who has seen this (I shared it with several people since I finished it) LOVED it.  I have already added a few verses in some categories, and intend to add more. (I have a LOT of verses I've studied on anger, for example!)

With the cover closed.  You can see Bible Key card because my Bible is a little smaller than intended. 

Here are the topics covered

A look at Proverbs where several colors are used on one page.

Thursday, February 02, 2012

More projects

I've been going crazy on Pinterest projects!  Here are the last few for now! :)

Project 1: EASY t-shirt transfer!

I saw a really neat idea to use plastic bags as iron ons!  I didn't have any cute shopping bags around, but I found these loot bags at Big Lots for 50 cents for 8 bags.  I'm seeing fun birthday party favors in our future!  Literally, the longest part of this project was cutting out the pictures!  (And then Aidan asked why I didn't include the web!)


How to:
  • Trim plastic bag to desired size. Note: Try to keep each piece smaller than the surface of your iron.  If you look closely at SpiderMan, you'll notice that his head is a bit deformed. When you first put heat on, the plastic will seize up and shrink.
  • Place pieces of plastic on shirt (or bag or ?!?!?!?) and cover with parchment paper. Note: Don't try to reuse the parchment paper. My princess shirt has some stray marks in the shape of Spiderman.
  • Heat with iron.  This step is very quick!  It doesn't take long.
  • Leave parchment paper on for a few minutes to set. Note: I noticed the paper starting to peel away from the shirt. That's when I lifted the paper.
  • If the decal seems to be lifting, put the parchment paper back down and iron some more.
  • I haven't tried washing these yet, but they say it's supposed to be permanent.

Project 2: Quick Scarves

I am not a scarf girl, but I found this tip to make a scarf out of t-shirts.  

My co-worker made one yesterday (from a t-shirt I picked up from a thrift store for a quarter!)


Tonight, Heather I did a "Mommy and Me" project.  We started with these shirts.


Heather modeling hers....


Both of us with our scarves.

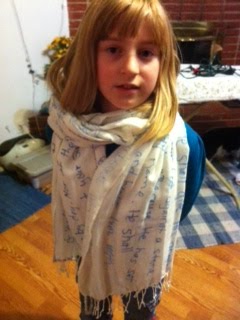
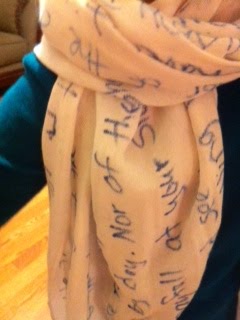
Word Scarves

I was looking for a birthday present for my partner at work. We've been a team for most of the 7 1/2 years I've been there.  For the past year and half, we've shared an office. (Prior to that we ALL shared an office!)  Diana shares my faith (and is even a member of my church).  As soon as I saw these word scarves on Pinterest, I knew I had to make one (well...two!) for Diana. 


Steps:
  • Select Scripture passage, quote, lyric, or poem.
  • Gather scarf and fabric pen/s. (I used Elmer's brand that writes on "anything" including fabric).
  • Start writing. Note: This will take awhile! My fabric pin kept catching on the weave.
  • Let the paint dry. Note: Some crafters choose to go over this with a paint brush for a more distinct look. I didn't do this.
  • Heat set the paint. I tried using an iron, but I wasn't sure it was helping.  So I threw the scarves into the dryer for about 5 minutes.  


Scarf #1
I decided to make one with a collection of "one another" passages.  Something like 60 times in the New Testament, the church is told how to treat each other: "love one another"; "bear one another's burdens"; "forgive one another"; "be kind one to another"; etc.  This one was a narrower red scarf. I wrote most of the words in black.  I left a space (which just happened to be exactly the width of the $5 bill that was on the counter!) for the "one another"s which I added with a white pen.

Heather was happy to model for me!


Scarf #2
I debated on what to put on this one. I thought about songs (old hymns as well as KLOVE currents were considered); the Serenity Prayer; and scripture passages. I decided on Psalm 91. "He that dwells in the secret place of the Most High, shall abide under the shadow of the almighty".  Even though I usually read the NIV or Message versions, I decided to go with the New King James Version.

This scarf is off white and the text is written in blue. I had room at the end, so I added the benediction blessing from Numbers. ("The LORD bless and keep you...")


This picture is the scarf spread out of the living room sofa.


Sharpie Tie Dye Shirts

Sharpies + Rubbing Alcohol + T-shirt = Cool, fun designs!

As soon as I heart about making tie dye with Sharpies, I had to dig a shirt out of my closet to try it!  I put a plastic cookie sheet inside the shirt, and told Heather to draw me a design. We experimented with various pattern types.  We used Hot Pink, Blue, Yellow and Green.

Steps:
  • Draw a design on the shirt with various Sharpie colors. Note: Don't overlap too many colors or it will turn brownish.  Experiment with various shapes, line thicknesses, etc.
  • Add rubbing alcohol and watch colors run together.  With the first one, we used a small dropper (very tedious!)  On the later ones, I got a 97 cent spray bottle from Wal-Mart. (Note: Clearly label! You don't want to spray your kids' hair with alcohol tomorrow morning!)
  • Let it dry completely.
  • Throw it in the dryer for a few minutes to heat set.
  • Wash shirt before wearing.


Closeup of area with shapes.  Lines stayed dark.

My favorite ones were the graduated shapes (like this heart) made with dots instead of thick lines.

Heather's 2nd design.  She was disappointed that it looked "tie dyed". I told her that is what it was supposed to do!  I love this one!


My co-worker decided to try one. (Note: "Los Pasitos" is the name of the early intervention agency we work for. Los Pasitos means "baby steps".)

I decided to try and see if I could do this a dark shirt.  The shirt is actually turquoise (like in the bottom picture!)  I did about 8 layers of nesting hearts.  (I'm not sure why the "before" picture is such a different color?!?!?!)

Sunday, January 29, 2012

Thrice Baked Cinnamon Rolls

A couple of weeks ago I bought some frozen bread dough to try a couple of recipes. Yesterday I took it out to thaw, but it was too late to use for dinner. At 11 pm I realized I needed to do something with it. So I scoured the Internet (and, of course Pinterest) for ideas. I settled on cinnamon rolls. It would be perfect. I'd get up a little early and feed my family homemade cinnamon rolls.

Well, I'm determined to share my successes, as well as my failures, as I take this journey to learn to cook. Today's experience falls somewhere in the middle.

The rolling the dough and doing the butter, cinnamon and sugar was easy. Even cutting and putting into a pan went smoothly. I covered them and put them in the fridge to rise over night.


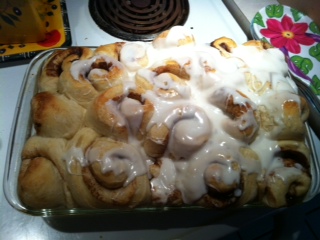
If you are a baker, you probably noticed the problem: too many rolls--too close together.

After baking about 20 minutes, they looked (and sounded--tap, tap) perfect. I covered them in homemade glaze (did you know the glaze is just powdered sugar and milk?!?!).  I did intentionally leave that left side unfrosted.


Unfortunately, the yummy goodness only went skin deep.  More than half of the dough was still raw (yuck!). After several make a few changes (separating some out, flipping all of the rolls) and 3 times in the oven, they looked like this:

They may not look as pretty as Cinnabons, but they tasted good.


Rag Curls Revisited

When I was a kid, my mom used to tie my hair with rags to make ringlets. I never learned how she did it (I'm gonna have to have her show me next time I see her) but this is what it looked like:


I've seen several posts on Pinterest about "no heat" curls. I tried the sock bun with little success. (I don't think my technique was right.)

Last night I tried another sock method. The blogger suggested using men's dress socks, but I figured if I was gonna tie socks in my hair I should use cute ones!


This is right after I took the socks out. (I know....I'm not quite awake, but I did think to grab my phoen to take a picture!)


With my face (but not glasses) on.


This last picture is 6 hours later.  After church I put my hair in a clip. Then I fixed and ate dinner. I took this picture after the kitchen was cleaned up.  That's a lot of curl left (for me!)


Sunday, January 15, 2012

Crockpot chicken

Found this recipe on Pinterest too.  Originally from Crockin Girls

Cream Cheese Chicken

Ingredients:
Butter
Salad dressing packet
Chicken breasts
Cream of chicken soup
Cream cheese

Melt butter and mix in dressing packet.
Add chicken and coat in butter mixture.
Cook on high 2 hours.
Add soup and cream cheese. Cook some more. (recipe said 15-20 minutes. I gave it another hour.)
Serve over rice, potatoes, or noodles. (I used mashed potatoes).

My small group said it was a keeper recipe!
This is what it looked like when I stated cooking.

Soda Cupcakes

I think this is the easiest recipe I've found on Pinterest! (Originally from: Cookies & Cups)

Ingredients:
One can of soda--any flavor.
One box cake mix--any flavor


Directions:
Combine cake mix and soda (pop, coke, fizzy, etc) until most of the lumps are gone.
Spoon into cupcake liners and bake in a 350 oven for 18-20 minutes.
All done!


I used white cake with cola and funfetti cake with lemon lime. Also, I didn't have cans so I just measured 12 ounces.

My two little ones loved it. The teenager said it was too sweet (but he doesn't really care for cupcakes). My small group loved them! They were moist and soft.

Pizza Monkey Bread

Another Pinterest recipe idea!


Ingredients:
Canned biscuits (I used 4 cans)
Pepperoni slices
Mozzarella cubes (I used string cheese cut into about 6 pieces)
Melted butter
Garlic (I used dehydrated bits. Garlic salt or powder or fresh stuff)

Directions:
Rub sides of Bundt cake pan with garlic butter.
Separate biscuits and flatten one. Place a slice of pepperoni and a chunk of cheese int the center and close into a ball.
Dip in garlic butter and place in pan.
Continue until pan is full. Drizzle extra butter on top.
Bake until golden brown.

Invert pan. Mine came out easily (almost too easily!) I dumped mine in a bowl and served with canned spaghetti sauce. My small group liked it! (So did my daughter. The boys wouldn't try it.)
Another recipe I saw called for cutting biscuit dough in half or quarter. Others used biscuit or bread dough.

Thursday, December 22, 2011

Update on my cooking lessons

I haven't had a chance to try any new real recipes, but I've been doing a lot of candy/treat making. After the new year, your can look forward to some new posts with at least one new recipe I've tried every week.

I've found a lot of things I want to try on pinterest I hope you enjoy!

Wednesday, December 21, 2011

Rocky Road

This was not the a recipe I found on pinterest!  This is a recipe we make every year.  It is very easy, and everyone loves it!

Start with peanut butter (creamy), peanuts, 2-3 bags of chips (your choice) and marshmallows.


Pour the chips into a bowl and mix (I used 1 semi sweet chocolate chips, one butterscotch chips, and one peanut butter chips). Add 1/2 cup of peanut butter. Melt in the microwave--stirring about every 30 seconds.


Add peanuts and marshmallows. Mix and dump onto wax paper.  I usually throw mine in the freezer for a few minutes. Break into desired size.